Black is a small software rasterizer for Rust. It allows one to create simple 3D visualizations that are run entirely on the CPU. It provides a fairly low level graphics API specifically geared towards triangle rasterization and allows for custom vertex and fragment shaders to be implemented with Rust traits.
This project was primarily written as an exercise in Rust. It is offered to anyone who finds it of use.
Building
This project was built against rustc 1.39.0-nightly (6ef275e6c 2019-09-24). The crate being used to present the window is the mini-fb crate. If building on Windows, you will need Windows C++ build tools. Once installed, just run the following from the project root to start the example project.
$ cargo run --release
Example
The following code renders single RGB triangle. Note that the Varying type must implement Interpolate which performs perspective correct per fragment interpolation across the triangle.
Note the implementation of TargetBuffer which is used to receive fragment shader output. If this code was output to a window, or other output device, this code will result in the image below.
Refer to the example project in this repository for an implementation of TargetBuffer. It is leveraging the most excellent mini_fb crate. This should work on Windows, Mac and Linux.
#[macro_use]externcrate black;use black::{TargetBuffer,DepthBuffer,Raster,Interpolate,VertexProgram,FragmentProgram};use black::{Vec4,Vec3,Mat4};// ----------------------------------------------// Uniform, Vertex and Varying types// ----------------------------------------------structUniform{projection:Mat4,matrix:Mat4,view:Mat4}structVertex{position:Vec4,color:Vec3}#[derive(Interpolate)]structVarying{position:Vec4,color:Vec3}// ----------------------------------------------// VertexProgram// ----------------------------------------------structVertexShader;implVertexProgramforVertexShader{typeUniform = Uniform;typeVarying = Varying;typeVertex = Vertex;fnmain(&self,uniform:&Uniform,vertex:&Vertex,varying:&mutVarying) -> Vec4{// assign varying to be interpolated across this primitive.
varying.position = vertex.position;
varying.color = vertex.color// transform the vertex (analogous to gl_Position transform)
input.position*(uniform.matrix*(uniform.view* uniform.projection))}}// -----------------------------------------// FragmentProgram// -----------------------------------------structFragmentShader;implFragmentProgramforFragmentShader{typeUniform = Uniform;typeVarying = Varying;fnmain(&self,uniform:&Uniform,varying:&Varying) -> Vec4{Vec4::new(
varying.color.x,
varying.color.y,
varying.color.z,1.0)}}// -----------------------------------------// TargetBuffer// -----------------------------------------structColorBuffer;implTargetBufferforColorBuffer{fnwidth(&self) -> usize{256}fnheight(&self) -> usize{256}fnset(&mutself,x:usize,y:usize,color:Vec4){// Invoked per fragment. Take vec4 output from fragment// shader and write to output device or other buffer.}}fnmain(){// Color and Depth buffers.letmut color_buffer = ColorBuffer;letmut depth_buffer = DepthBuffer::new(256,256);// Sets up the uniforms for this draw. Works// in a similar fashion to GLSL uniforms.let uniform = Uniform{projection:Mat4::perspective_fov(90.0,1.0,0.1,1000.0),matrix:Mat4::identity(),view:Mat4::look_at(&Vec3::new(0.0,0.0,3.0),&Vec3::new(0.0,0.0,0.0),&Vec3::new(0.0,1.0,0.0),),}// Rasterizes this triangle into the given// OutputBuffer. Depth values stored in the// given depth_buffer.Raster::triangle(&VertexShader,&FragmentShader,&mut depth_buffer,&mut color_buffer,&uniform,&Vertex{position:Vec4::new(0.0,1.0,0.0,1.0),color:Vec3::new(1.0,0.0,0.0),},&Vertex{position:Vec4::new(-1.0, -1.0,0.0,1.0),color:Vec3::new(0.0,1.0,0.0),},&Vertex{position:Vec4::new(1.0, -1.0,0.0,1.0),color:Vec3::new(0.0,0.0,1.0),});}
Hacktoberfest 2023 is a month-long virtual festival celebrating open-source contributions. It’s the perfect entry point for newcomers to the world of open source!
Throughout October 2023, all you need to do is contribute to any open-source project and merge at least four pull requests. Yes, you can choose any project and any type of contribution. You don’t need to be an expert coder; it could be a bug fix, an improvement, or even a documentation update!
Hacktoberfest welcomes participants from all corners of our global community. Whether you’re an experienced developer, a coding enthusiast just starting out, an event organizer, or a company of any size, you can help drive the growth of open source and make positive contributions to an ever-expanding community. People from diverse backgrounds and skill levels are encouraged to take part.
Hacktoberfest is an inclusive event open to everyone in our global community!
Pull requests can be submitted to any GitHub or GitLab-hosted repository or project.
You can sign up anytime between October 1 and October 31, 2023.
🤔 Why Should I Contribute?
Hacktoberfest has a straightforward goal: to promote open source and reward those who contribute to it.
However, it’s not just about the T-shirts and stickers; it’s about supporting and celebrating open source while giving back to the community. If you’ve never contributed to open source before, now is the perfect time to start. Hacktoberfest offers a wide range of contribution opportunities, including plenty suitable for beginners.
👨💻 What Can I Contribute?
Hacktoberfest is inclusive and open to everyone, regardless of your background or skill level. Whether you’re a seasoned developer, a student learning to code, an event host, or a company of any size, you can help foster the growth of open source and make meaningful contributions to a thriving community.
Contributions don’t have to be limited to code; they can include documentation updates or fixing typos.
You can contribute to any open source project hosted on GitHub.com between October 1 and October 31, 2023. Look for issues labeled with “hacktoberfest” or “good-first-issue” on GitHub; these are typically beginner-friendly and easy to tackle.
💻 Quickstart
Assign yourself an issue and fork this repo. For more information read [CONTRIBUTING].
Clone repo locally using git clone https://github.com/Coderich-Community/Hacktoberfest-2023
After cloning make sure you create a new branch by using git checkout -b my-branch
Start making edits in the newly created git branch. Firstly, add your name in the file
Add the modified/created files to the staging using git add .
Commit the changes made into the checked out branch using git commit -m "commit message"
Push the changes using git push origin my-branch
✨ Contributing
By contributing to this repository, you adhere to the rules in our Here are a few general instructions for people willing to develop onto the codebase.
• Create issues to discuss your ideas with the maintainers
Creating issues before starting to work on your pull request helps you stay on the right track. Discuss your proposal well with the current maintainers.
• Keep the code clean
Follow the code formatting standards of the repository by referring to existing source files.
• Comments are the best
Make it clear what hacks you’ve used to keep this website afloat. Your work needs to be understood first, before getting appreciated.
• Keep the Contributors section up-to-date
To display your contributions to visitors and future contributors.
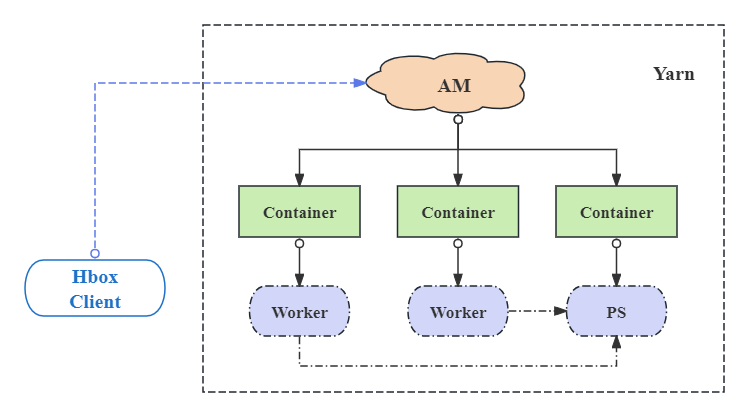
Hbox is a convenient and efficient scheduling platform combined with the big data and artificial intelligence, support for a variety of machine learning, deep learning frameworks. Hbox is running on the Hadoop Yarn and has integrated deep learning frameworks such as Tensornet, TensorFlow, MXNet, Caffe, Theano, PyTorch, Keras, XGBoost,horovod, openmpi, tensor2tensor. support GPU resource schedule, run in docker and restful api management interface. Hbox has the satisfactory scalability and compatibility.
Client: start and get the state of the application.
ApplicationMaster(AM): the role for the internal schedule and lifecycle manager, including the input data distribution and containers management.
Container: the actual executor of the application to start the progress of Worker or PS(Parameter Server), monitor and report the status of the progress to AM, and save the output, especially start the TensorBoard service for TensorFlow application.
Functions
1 Support Multiple Deep Learning Frameworks
Besides the distributed mode of TensorFlow and MXNet frameworks, Hbox supports the standalone mode of all deep learning frameworks such as Caffe, Theano, PyTorch. Moreover, Hbox allows the custom versions and multi-version of frameworks flexibly.
2 Unified Data Management Based On HDFS
Training data and model result save to HDFS(support S3). Hbox is enable to specify the input strategy for the input data --input by setting the --input-strategy parameter or hbox.input.strategy configuration. Hbox support three ways to read the HDFS input data:
Download: AM traverses all files under the specified HDFS path and distributes data to workers in files. Each worker download files from the remote to local.
Placeholder: The difference with Download mode is that AM send the related HDFS file list to workers. The process in worker read the data from HDFS directly.
InputFormat: Integrated the InputFormat function of MapReduce, Hbox allows the user to specify any of the implementation of InputFormat for the input data. AM splits the input data and assigns fragments to the different workers. Each worker passes the assigned fragments through the pipeline to the execution progress.
Similar with the read strategy, Hbox allows to specify the output strategy for the output data --output by setting the --output-strategy parameter or hbox.output.strategy configuration. There are two kinds of result output modes:
Upload: After the program finished, each worker upload the local directory of the output to specified HDFS path directly. The button, “Saved Model”, on the web interface allows user to upload the intermediate result to remote during the execution.
OutputFormat: Integrated the OutputFormat function of MapReduce, Hbox allows the user to specify any of the implementation of OutputFormat for saving the result to HDFS.
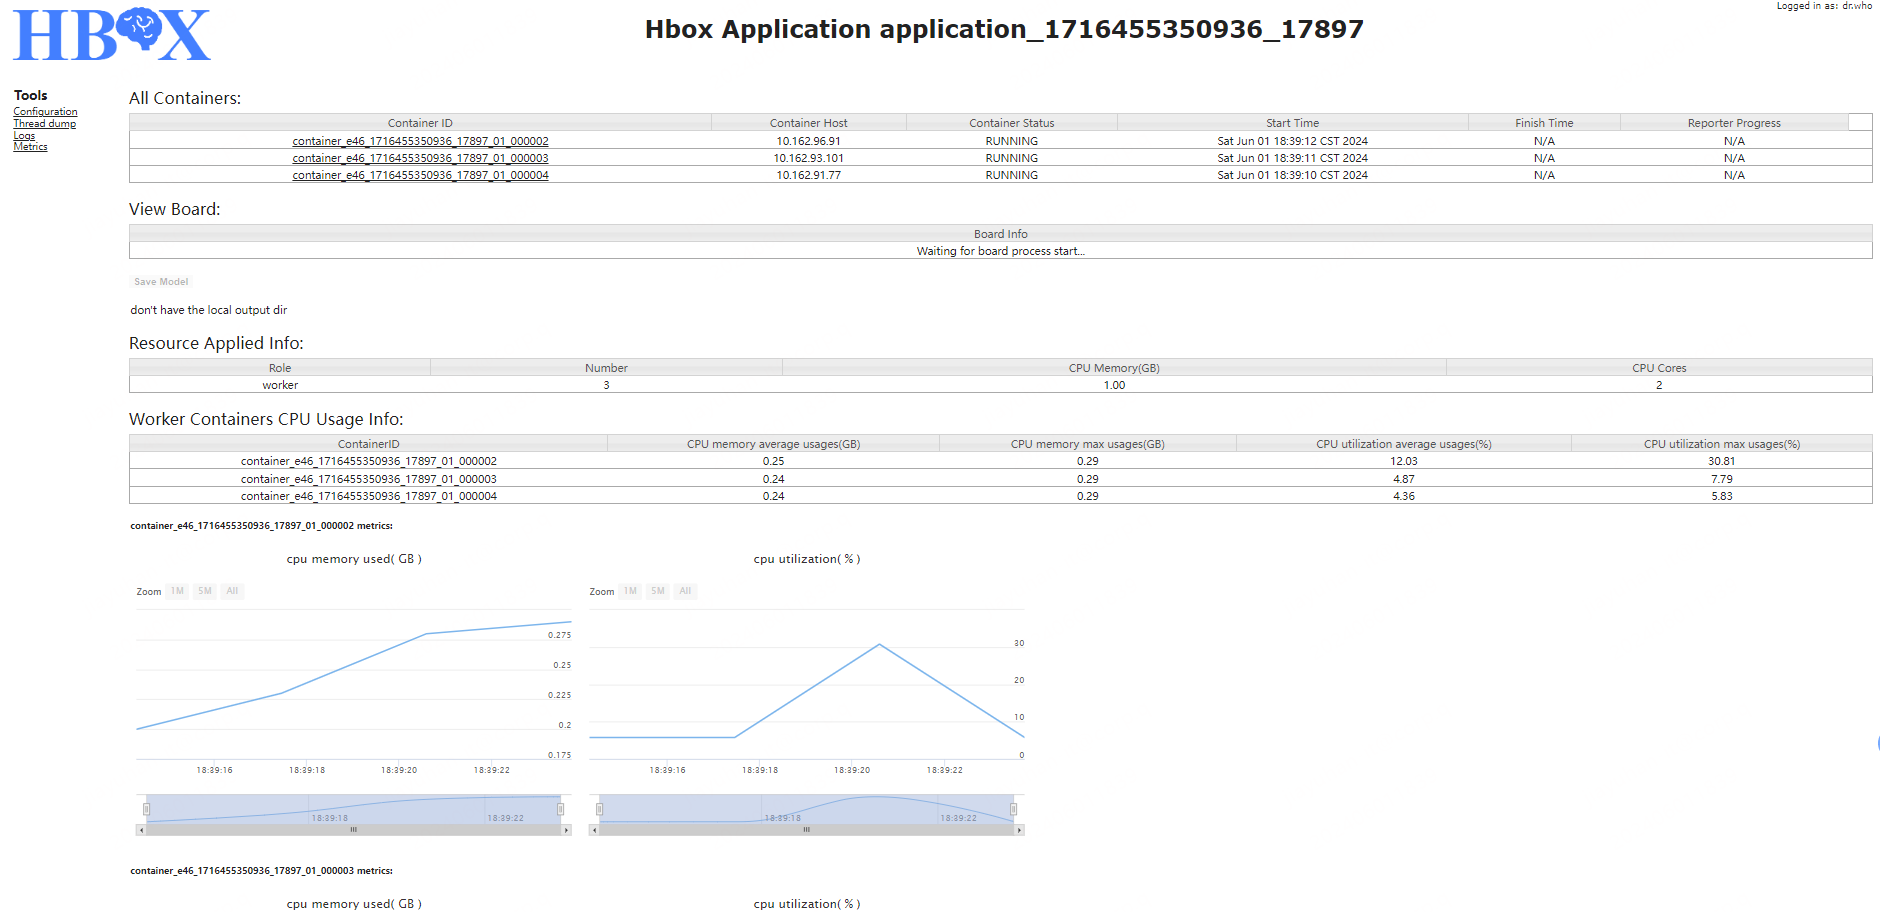
The application interface can be divided into four parts:
All Containers:display the container list and corresponding information, including the container host, container role, current state of container, start time, finish time, current progress.
View TensorBoard:If set to start the service of TensorBoard when the type of application is TensorFlow, provide the link to enter the TensorBoard for real-time view.
Save Model:If the application has the output, user can upload the intermediate output to specified HDFS path during the execution of the application through the button of “Save Model”. After the upload finished, display the list of the intermediate saved path.
Worker Metrix:display the resource usage information metrics of each worker.
As shown below:
4 Compatible With The Code At Native Frameworks
Except the automatic construction of the ClusterSpec at the distributed mode TensorFlow framework, the program at standalone mode TensorFlow and other deep learning frameworks can be executed at Hbox directly.
Compilation & Deployment Instructions
1 Compilation Environment Requirements
jdk >= 1.8
Maven >= 3.6.3
2 Compilation Method
Run the following command in the root directory of the source code:
./mvnw package
After compiling, a distribution package named hbox-1.1-dist.tar.gz will be generated under core/target in the root directory.
Unpacking the distribution package, the following subdirectories will be generated under the root directory:
bin: scripts for managing application jobs
sbin: scripts for history service
lib: dependencies jars
libexec: common scripts and hbox-site.xml configuration examples
hbox-*.jar: HBox jars
To setup configurations, user need to set HBOX_CONF_DIR to a folder containing a valid hbox-site.xml,
or link this folder to $HBOX_HOME/conf.
3 Deployment Environment Requirements
CentOS 7.2
Java >= 1.8
Hadoop = 2.6 — 3.2 (GPU requires 3.1+)
[optional] Dependent environment for deep learning frameworks at the cluster nodes, such as TensorFlow, numpy, Caffe.
4 Hbox Client Deployment Guide
Under the “conf” directory of the unpacking distribution package “$HBOX_HOME”, configure the related files:
hbox-env.sh: set the environment variables, such as:
JAVA_HOME
HADOOP_CONF_DIR
hbox-site.xml: configure related properties. Note that the properties associated with the history service needs to be consistent with what has configured when the history service started.For more details, please see the Configuration part。
log4j.properties:configure the log level
5 Start Method of Hbox History Service [Optional]
run $HBOX_HOME/sbin/start-history-server.sh.
Quick Start
Use $HBOX_HOME/bin/hbox-submit to submit the application to cluster in the Hbox client.
Here are the submit example for the TensorFlow application.
1 upload data to hdfs
upload the “data” directory under the root of unpacking distribution package to HDFS
Customized LinkedIn Profile to JSON Resume Browser Tool
🖼️ This is a slightly tweaked version of the LinkedIn to JSON Resume Chrome Extension. That project is outdated because it isn’t using the latest version of JSON Schema. Furthermore, I have customized that schema myself, so I have to base this Chrome extension off of my own schema.
Build
npm install
Make a code change and then run npm run build-browserext, which will generate files in ./build-browserext.
npm run package-browserext will side-load the build as a ZIP in webstore-zips directory.
If you want to do something else besides side-loading, read the original README.
Usage
For local use:
npm run package-browserext will side-load the build as a ZIP in webstore-zips directory.
In Chrome, go to chrome://extensions then drag-n-drop the ZIP onto the browser. Note that developer mode must be turned on.
Go to your LinkedIn profile, i.e. www.linkedin.com/in/anthonydellavecchia and click on LinkedIn Profile to JSON button.
After a second or two, JSON will be generated. Copy this, as it is a raw/pre-transformation version.
Note that in the Chrome Extension, you can select either the custom version of the JSON schema that I created, or the last stable build from v0.0.16 (mine is based on v1.0.0).
Design
browser-ext/popup.html holds the HTML for the Chrome Extension.
jsonresume.scheama.latest.ts is the latest schema from JSON Resume Schema (v1.0.0).
jsonresume.scheama.stable.ts is the stable but very outdated schema from JSON Resume Schema (v0.0.16).
src/main.js holds most of the JavaScript to get and transform data from LinkedIn.
src/templates.js holds the templates for the schema.
Click to expand README.md of the source repository!
An extremely easy-to-use browser extension for exporting your full LinkedIn Profile to a JSON Resume file or string.
Usage / Installation Options:
There are (or were) a few different options for how to use this:
Feel free to install, use, and then immediately uninstall if you just need a single export
No data is collected
[Deprecated] (at least for now): Bookmarklet
This was originally how this tool worked, but had to be retired as a valid method when LinkedIn added a stricter CSP that prevented it from working
Code to generate the bookmarklet is still in this repo if LI ever loosens the CSP
Schema Versions
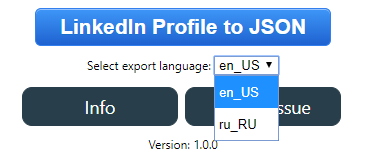
This tool supports multiple version of the JSON Resume Schema specification for export, which you can easily swap between in the dropdown selector! ✨
“Which schema version should I use?”
If you are unsure, you should probably just stick with “stable”, which is the default. It should have the most widespread support across the largest number of platforms.
Support for Multilingual Profiles
LinkedIn has a unique feature that allows you to create different versions of your profile for different languages, rather than relying on limited translation of certain fields.
For example, if you are bilingual in both English and German, you could create one version of your profile for each language, and then viewers would automatically see the correct one depending on where they live and their language settings.
I’ve implemented support (starting with v1.0.0) for multilingual profile export through a dropdown selector:
The dropdown should automatically get populated with the languages that the profile you are currently viewing supports, in addition to your own preferred viewing language in the #1 spot. You should be able to switch between languages in the dropdown and click the export button to get a JSON Resume export with your selected language.
Note: LinkedIn offers language choices through a Locale string, which is a combination of country (ISO-3166) and language (ISO-639). I do not make decisions as to what languages are supported.
This feature is the part of this extension most likely to break in the future; LI has some serious quirks around multilingual profiles – see my notes for details.
Export Options
There are several main buttons in the browser extension, with different effects. You can hover over each button to see the alt text describing what they do, or read below:
LinkedIn Profile to JSON: Converts the profile to the JSON Resume format, and then displays it in a popup modal for easy copying and pasting
Download JSON Resume Export: Same as above, but prompts you to download the result as an actual .json file.
Download vCard File: Export and download the profile as a Virtual Contact File (.vcf) (aka vCard)
There are some caveats with this format; see below
vCard Limitations and Caveats
Partial birthdate (aka BDAY) values (e.g. where the profile has a month and day, but has not opted to share their birth year), are only supported in v4 (RFC-6350) and above. This extension currently only supports v3, so in these situations the tool will simply omit the BDAY field from the export
The LinkedIn display photo (included in vCard) served by LI is a temporary URL, with a fixed expiration date set by LinkedIn. From observations, this is often set months into the future, but could still be problematic for address book clients that don’t cache images. To work around this, I’m converting it to a base64 string; this should work with most vCard clients, but also increases the vCard file size considerably.
Chrome Side-loading Instructions
Instead of installing from the Chrome Webstore, you might might want to “side-load” a ZIP build for either local development, or to try out a new release that has not yet made it through the Chrome review process. Here are the instructions for doing so:
Find the ZIP you want to load
If you want to side-load the latest version, you can download a ZIP from the releases tab
If you want to side-load a local build, use npm run package-browserext to create a ZIP
Go to Chrome’s extension setting page (chrome://extensions)
Turn on developer mode (upper right toggle switch)
Drag the downloaded zip to the browser to let it install
Test it out, then uninstall
You can also unpack the ZIP and load it as “unpacked”.
Troubleshooting
When in doubt, refresh the profile page before using this tool.
Troubleshooting – Debug Log
If I’m trying to assist you in solving an issue with this tool, I might have you share some debug info. Currently, the easiest way to do this is to use the Chrome developer’s console:
Append ?li2jr_debug=true to the end of the URL of the profile you are on
Open Chrome dev tools, and specifically, the console (instructions)
Run the extension (try to export the profile), and then look for red messages that show up in the console (these are errors, as opposed to warnings or info logs).
You can filter to just error messages, in the filter dropdown above the console.
Updates:
Update History (Click to Show / Hide)
Date
Release
Notes
2/27/2021
2.1.2
Fix: Multiple issues around work history / experience; missing titles, ordering, etc. Overhauled approach to extracting work entries.
12/19/2020
2.1.1
Fix: Ordering of work history with new API endpoint (#38)
12/7/2020
2.1.0
Fix: Issue with multilingual profile, when exporting your own profile with a different locale than your profile’s default. (#37)
Fix: Incorrect birthday month in exported vCards (off by one) Fix: Better pattern for extracting profile ID from URL, fixes extracting from virtual sub-pages of profile (e.g. /detail/contact-info), or with query or hash strings at the end.
7/7/2020
1.4.2
Fix: For work positions, if fetched via profilePositionGroups, LI ordering (the way it looks on your profile) was not being preserved.
7/31/2020
1.4.1
Fix: In some cases, wrong profileUrnId was extracted from current profile, which led to work history API call being ran against a different profile (e.g. from “recommended section”, or something like that).
7/21/2020
1.4.0
Fix: For vCard exports, Previous profile was getting grabbed after SPA navigation between profiles.
7/6/2020
1.3.0
Fix: Incomplete work position entries for some users; LI was limiting the amount of pre-fetched data. Had to implement request paging to fix. Also refactored a lot of code, improved result caching, and other tweaks.
6/18/2020
1.2.0
Fix / Improve VCard export feature.
6/5/2020
1.1.0
New feature: vCard export, which you can import into Outlook / Google Contacts / etc.
5/31/2020
1.0.0
Brought output up to par with “spec”, integrated schemas as TS, added support for multilingual profiles, overhauled JSDoc types. Definitely a breaking change, since the output has changed to mirror schema more closely (biggest change is website in several spots has become url)
5/9/2020
0.0.9
Fixed “references”, added certificates (behind setting), and formatting tweaks
4/4/2020
0.0.8
Added version string display to popup
4/4/2020
0.0.7
Fixed and improved contact info collection (phone, Twitter, and email). Miscellaneous other tweaks.
10/22/2019
0.0.6
Updated recommendation querySelector after LI changed DOM. Thanks again, @ lucbpz.
10/19/2019
0.0.5
Updated LI date parser to produce date string compliant with JSONResume Schema (padded). Thanks @ lucbpz.
9/12/2019
0.0.4
Updated Chrome webstore stuff to avoid LI IP usage (Google took down extension page due to complaint). Updated actual scraper code to grab full list of skills vs just highlighted.
8/3/2019
NA
Rewrote this tool as a browser extension instead of a bookmarklet to get around the CSP issue. Seems to work great!
7/22/2019
NA
ALERT: This bookmarklet is currently broken, thanks to LinkedIn adding a new restrictive CSP (Content Security Policy) header to the site. I’ve opened an issue to discuss this, and both short-term (requires using the console) and long-term (browser extension) solutions.
6/21/2019
0.0.3
I saw the bookmarklet was broken depending on how you came to the profile page, so I refactored a bunch of code and found a much better way to pull the data. Should be much more reliable!
What is JSON Resume?
“JSON Resume” is an open-source standard / schema, currently gaining in adoption, that standardizes the content of a resume into a shared underlying structure that others can use in automated resume formatters, parsers, etc. Read more about it here, or on GitHub.
What is this tool?
I made this because I wanted a way to quickly generate a JSON Resume export from my LinkedIn profile, and got frustrated with how locked down the LinkedIn APIs are and how slow it is to request your data export (up to 72 hours). “Install” the tool to your browser, then click to run it while looking at a LinkedIn profile (preferably your own), and my code will grab the various pieces of information off the page and then show a popup with the full JSON resume export that you can copy and paste to wherever you would like.
Development
With the rewrite to a browser extension, I actually configured the build scripts to be able to still create a bookmarklet from the same codebase, in case the bookmarklet ever becomes a viable option again.
Building the browser extension
npm run build-browserext will transpile and copy all the right files to ./build-browserext, which you can then side-load into your browser. If you want to produce a single ZIP archive for the extension, npm run package-browserext will do that.
Use build-browserext-debug for a source-map debug version. To get more console output, append li2jr_debug=true to the query string of the LI profile you are using the tool with.
The bookmark can then be dragged to your bookmarks from the final build/install-page.html
All of the above should happen automatically when you do npm run build-bookmarklet.
If this ever garners enough interest and needs to be updated, I will probably want to re-write it with TypeScript to make it more maintainable.
LinkedIn Documentation
For understanding some peculiarities of the LI API, see LinkedIn-Notes.md.
Debugging
Debugging the extension is a little cumbersome, because of the way Chrome sandboxes extension scripts and how code has to be injected. An alternative to setting breakpoints in the extension code itself, is to copy the output of /build/main.js and run it via the console.
Even if you have the repo inside of a local static server, you can’t inject it via a script tag or fetch & eval, due to LI’s restrictive CSP.
If you do want to find the actual injected code of the extension in Chrome dev tools, you should be able to find it under Sources -> Content Scripts -> top -> JSON Resume Exporter -> {main.js}
Debugging Snippets
Helpful snippets (subject to change; these rely heavily on internals):
// Get main profileDB (after running extension)varprofileRes=awaitliToJrInstance.getParsedProfile(true);varprofileDb=awaitliToJrInstance.internals.buildDbFromLiSchema(profileRes.liResponse);
DISCLAIMER:
This tool is not affiliated with LinkedIn in any manner. Intended use is to export your own profile data, and you, as the user, are responsible for using it within the terms and services set out by LinkedIn. I am not responsible for any misuse, or repercussions of said misuse.
Runs the app in the development mode.
Open http://localhost:3000 to view it in the browser.
The page will reload if you make edits.
You will also see any lint errors in the console.
npm test
Launches the test runner in the interactive watch mode.
See the section about running tests for more information.
npm run build
Builds the app for production to the build folder.
It correctly bundles React in production mode and optimizes the build for the best performance.
The build is minified and the filenames include the hashes.
Your app is ready to be deployed!
See the section about deployment for more information.
npm run eject
Note: this is a one-way operation. Once you eject, you can’t go back!
If you aren’t satisfied with the build tool and configuration choices, you can eject at any time. This command will remove the single build dependency from your project.
Instead, it will copy all the configuration files and the transitive dependencies (Webpack, Babel, ESLint, etc) right into your project so you have full control over them. All of the commands except eject will still work, but they will point to the copied scripts so you can tweak them. At this point you’re on your own.
You don’t have to ever use eject. The curated feature set is suitable for small and middle deployments, and you shouldn’t feel obligated to use this feature. However we understand that this tool wouldn’t be useful if you couldn’t customize it when you are ready for it.
A 100% open source modern, accessible, and multilingual website template designed specifically for government portals. Available as both a static HTML template and a full WordPress CMS solution with advanced multilingual support.
Service Categories (/wp-json/wp/v2/service_category)
Custom icons and color schemes
Multilingual category management
Government Updates (/wp-json/wp/v2/gov_update)
Featured updates and announcements
Date-based sorting and archives
Enhanced API Endpoints
/wp-json/opengovui/v1/featured-services?lang=en  # Featured services
/wp-json/opengovui/v1/categories?lang=si         # Service categories
/wp-json/opengovui/v1/updates?lang=ta           # Government updates
/wp-json/opengovui/v1/services?lang=en          # All services
Content Population System
One-Click Setup: Automatically creates sample government content
Multilingual Content: Creates content in English, Sinhala, and Tamil
Realistic Data: Government services, categories, and updates
Hero section with featured services from WordPress
Topic categories with dynamic icon navigation
Government updates with content management
Footer with important links and social media
🔄 Customisation
WordPress CMS (Recommended)
Admin Dashboard: Full WordPress interface for content management
Content Population: Use the built-in system to create sample content
Service Management: Add/edit services with icons, URLs, and metadata
Category Management: Create categories with custom colors and icons
Update Publishing: Manage government announcements and news
Multilingual Content: Full translation support via Polylang
Custom Fields: Rich metadata for all content types
Static Template
Edit the HTML directly to change content
Update the data-i18n attributes and corresponding translation files
Modify icons by changing FontAwesome classes
Customize CSS for branding
Styling
WordPress version inherits all static template styling
Edit theme’s style.css for WordPress-specific customizations
FontAwesome 6.5.1 included for comprehensive icon support
Custom color schemes available for categories
🔌 Plugin Dependencies
Required for Full Functionality
Polylang (Free): Multilingual support
Language management and switching
Content translation workflow
Meta field synchronization
Recommended
Classic Editor: For traditional WordPress editing experience
Yoast SEO: Enhanced SEO with multilingual support
📋 Version History
v2.1.0 – Enhanced WordPress CMS with Polylang Integration (Current)
Full Polylang multilingual plugin support
AI-powered translation system with Claude Sonnet 3.7 integration
Advanced REST API endpoints
Content population system
Intelligent translation manager with admin dashboard
Enhanced admin interface
v2.0.0 – WordPress CMS Integration
v1.2.0 – Complete Static Template with Tamil translations
v1.1.0 – Fira Sans typography update
v1.0.0 – Initial static template release
🚀 API Documentation
REST API Endpoints
Custom OpenGovUI Endpoints
# Get featured services
GET /wp-json/opengovui/v1/featured-services?lang=en

# Get service categories
GET /wp-json/opengovui/v1/categories?lang=si

# Get government updates
GET /wp-json/opengovui/v1/updates?lang=ta

# Get all services
GET /wp-json/opengovui/v1/services?lang=en&category=health
Standard WordPress Endpoints
# Government Services
GET /wp-json/wp/v2/gov_service

# Service Categories
GET /wp-json/wp/v2/service_category

# Government Updates
GET /wp-json/wp/v2/gov_update
All endpoints support language parameters and return properly formatted content with metadata.
📄 Licence
This project is licensed under the MIT Licence – see the LICENCE file for details.
🤝 Contributing
Contributions are welcome! Feel free to submit pull requests or open issues for any improvements.
Here is what is known about the programming language Quylthulg.
Quylthulg:
is a programming language;
is named Quylthulg;
was designed by Chris Pressey;
does not, quite apart from prevailing trends in programming
practice, shun the use of goto;
is, however, somewhat particular about wheregoto may be used
(goto may only occur inside a data structure);
is purely functional (in the sense that it does not allow
“side-effectful” updates to values);
forbids recursion;
provides but a single looping construct: foreach, which applies an
expression successively to each value in a data structure;
is Turing-complete; and
boasts an argument-less macro expansion facility (in which recursion
is also forbidden.)
Syntax
The syntax for identifiers draws from the best parts of the esteemed
languages BASIC and Perl. Like Perl, all identifiers must be preceded by
a $ symbol, and like BASIC, all identifiers must be followed by a $
symbol. Well, OK, that’s for strings anyway, but we don’t care about
their types really, so we use $ for everything. (Also, studies show
that this syntax can help serious TeX addicts from “bugging out”.)
A nice practical upshot of this is that identifier names may contain any
characters whatsoever (excepting $), including whitespace.
Because of this, the syntax for string literals can be, and is, derived
from the syntax for identifiers. A string literal is given by a ~
followed by an identifier; the textual content of the name of the
identifier is used as the content of the string literal. A string
literal consisting of a single $ symbol is given by ~~.
Many find the syntax for labels to be quite sumilar to that for
identifiers. (Some even find it to be quite similar.) Labels are
preceded and followed by : symbols, and may contain any symbol except
for :.
Syntax for binary operations follows somewhat in the footsteps of the
identifier syntax. It is a combination of prefix, infix, and postfix
syntax, where the two terms must be preceeded, followed, and seperated
by the same symbol. We call this notation panfix. It is perhaps worth
noting that, like postfix, panfix does not require the deployment of
arcane contrivances such as parentheses to override a default operator
precedence. At the same time, panfix allows terms to be specified in the
same order and manner as infix, an unquestionably natural and intuitive
notation to those who have become accustomed to it.
So, we give some examples:
*+1+2+*3*
&~$The shoes are $&&~~&~$9.99 a pair.$&&
The first example might be stated as (1+2)*3 in conventional, icky
parenthesis-ful notation, and evaluates to 9. The second evaluates to
the string “The shoes are $9.99 a pair.”
There are no unary operators in Quylthulg. (Note that ~ isn’t really a
unary operator, actually not an operator at all, because it must be
followed by an identifier, not an expression. Well, maybe it’s a special
kind of operator then, an identifier-operator perhaps. But you see what
I’m getting at, don’t you? Hopefully not.)
There is a special 6-ary operator, foreach. It has its own syntax
which will be covered below.
Data Types
Strings and Integers
Yes. Also a special type called abort, of which there is a single
value abort, which you’ll learn about later.
Lists
The sole data structure of note in Quylthulg is the list. Lists are
essentially identical to those found in other functional languages such
as Scheme: they are either the special value null, which suggests an
empty list, or they consist of a cons cell, which is a pair of two
other values. By convention, the first of this pair is the value of this
list node, and the second is a sublist (a null or a cons) which
represents the rest of this list.
The value of a list node may be any value: a scalar such as an integer
or a string, another (embedded sub)list, or the special value abort. cons cells are constructed by the , panfix operator. Some examples
follow:
,1,,2,,3,null,,,
,1,,2,3,,
The first example constructs a proper list. So-called “improper” lists,
which purely by convention do not end with null, can also be
constructed: that’s the second example.
When all of the terms involved are literal constants embedded in the
program text, there is a shorthand syntax for these list expressions,
stolen from the Prolog/Erlang school:
[1, 2, 3]
[1, 2 | 3]
Note, however, that [] is not shorthand for null. Note also that
when this syntax is used, all values must be literal constants: there
will be no tolerance for variables. There will, however, be tolerance
for gotos and labels; see below for more on that.
Cyclic Lists
Labels and the goto construct enable the definition of cyclic data
structures like so:
Note that this can only be done in literal constant data structure
expressions, not in , (consing) operations or expression involving a
variable. This is to avoid the dynamic construction of labelled terms,
which just a tad mind-bending and which I’ve decided to save for a
sequel to Quylthulg, whatever and whenever that might be. Note also that
labels have their own syntax during declaration, but (oh so helpfully)
insist on being referred to in gotos by the $ syntax used for
identifiers.
List Operators
The values contained in a cons cell can be extracted by the felicitous
use of the binary operators < (‘first’) and > (‘rest’). For both of
these operators, the left-hand side is the cons cell to operate on,
and the right-hand side is an expression which the operator will
evaluate to in the case that it cannot successfully extract the value
from the cons cell (e.g., the left-hand side is not in fact a cons
cell but rather something else like a null or a number or a string or abort.
There is also an operator ; which appends one list (the right-hand
side) onto the end of another list (the left-hand side.) This is
probably not strictly necessary, since as we’ll see later we can probably
build something equivalent using foreaches and macros, but what the
hell, we can afford it. Party down.
These list operators honour cyclic lists, so that >[:X: 4 | goto :X:]>abort>, to take just one instance, evaluates to 4.
Control Flow
Quylthulg’s sole looping construct, foreach, is a recursing abortable
“fold” operation. It is passed a data structure to traverse, an
expression (called the body) that it will apply to each value it
encounters in the traversed data structure, and an initial value called
the accumulator. Inside the body, two identifiers are bound to two
values: the value in the data structure that the body is currently being
applied to, and the value of the current value. The names of the
idenfiers so bound are specified in the syntax of the foreach
operator. The value that the body evaluates to is used as the
accumulator for the next time the body is evaluated, on the next value
in the data structure. The value that foreach evaluates to is the
value of the final accumulator (emphasis mine.) The full form of this
operator is as follows:
foreach $var$ = data-expr with $acc$ = initial-expr be loop-expr else be otherwise-expr
foreach traverses the data structure in this manner: from beginning to
end. It is:
recursing, meaning if the current element of the list is itself a
(sub)list, foreach will begin traversing that (sub)list (with the
same body and current accumulator, natch) instead of passing the
(sub)list to the body; and
abortable, meaning that the loop-expr may evaluate to a special
value abort, which causes traversal of the current (sub)list to
cease immediately, returning to the traversal of the containing
list, if any.
If the data-expr evaluates to some value besides a cons cell (for
example, null or an integer or a string), then the loop-expr is
ignored and the otherwise-expr is evaluated instead.
As an example,
-foreach $x$ = [2, 3, 4] with $a$ = 1 be *$a$*$x$* else be null-1-
will evaluate to 23. On the other hand,
foreach $x$ = null with $a$ = 1 be $a$ else be 23
will also evaluate to 23.
Macro System
Quylthulg boasts an argument-less macro expansion system. (Yes, there is
no argument about it: it boasts it. It is quite arrogant, you know.)
Where-ever text of the form {foo} appears in the source code, the
contents of the macro named foo are inserted at that point, replacing {foo}. This process is called the expansion of foo. But it gets
worse: whereever text of the form {bar} appears in the contents of
that macro called foo, those too will be replaced by the contents of
the macro called bar. And so on. Three things to note:
If there is no macro called foo, {foo} will not be expanded.
If {foo} appears in the contents of foo, it will not be
expanded.
Nor will it be expanded if it appears in the contents of foo as
the result of expanding some other macro in the contents of foo.
(I stand corrected. That was more like 2.5 things to note.)
Macros can be defined and redefined with the special macro-like form {*[foo][bar]}. The first text between square brackets is the name of
the macro being defined; the text between the second square brackets is
the contents. Both texts can contain any symbols except unmatched ]‘s.
i.e. you can put square brackets in these texts as long as they nest
properly.
Now you see why we don’t need arguments to these macros: you can simply
use macros as arguments. For example,
{*[SQR][*{X}*{X}*]}{*[X][5]}{SQR}
uses an “argument macro” called X which it defines as 5 before
calling the SQR macro that uses it.
Note that macros are expanded before any scanning or parsing of the
program text begins. Thus they can be used to define identifiers,
labels, etc.
Comments
The macro system also provides a way to insert comments into a Quylthulg
program. It should be noted that there are at least three schools of
thought on this subject.
The first school (Chilton County High School in Clanton, Alabama) says
that most comments that programmers write are next to useless anyway
(which is absolutely true) so there’s no point in writing them at all.
The second school (Gonzaga College S.J. in Dublin, Ireland — not to be
confused with Gonzaga University in Spokane, Washington) considers
comments to be valuable as comments, but not as source code. They
advocate their use in Quylthulg by the definition of macros that are
unlikely to be expanded for obscure syntactical reasons. For example, {*[}][This is my comment!]}. Note that that macro can be expanded in
Quylthulg using {}}; it’s just that the Gonzaga school hopes that you
won’t do that, and hopes you get a syntax error if you try.
The third school (a school of fish) believes that comments are valuable,
not just as comments, but also as integral (or at least distracting)
parts of the computation, and champions their use in Quylthulg as string
literals involved in expressions that are ultimately discarded. For
example, <~$Addition is fun!$<+1+2+<.
Integration with the Rest of the Language
To dispel the vicious rumours that the macro system used in Quylthulg
and the Quylthulg language are really independent and separate entities
which just happen to be sandwiched together there, we are quick to
point out that they are bound by two very important means:
At the beginning of the program, at a global scope, the identifier $Number of Macros Defined$ is bound to an integer constant
containing the number of unique macros that were defined during
macro expansion before the program was parsed.
The panfix operator % applies macros to a Quylthulg string at
runtime. The expression on the left-hand side should evaluate to a
string which contains macro definitions. The expression on the
right-hand side is the string to expand using these macro
definitions.
Turing-Completeness
Now, I claim that Quylthulg is Turing-complete — that is, that it can
compute anything that a Turing machine (or any other Turing-complete
system) can. I would provide a proof, but since the point of a proof is
to dispel doubt, and since you have not expressed any doubt so far (at
least none that I have been able to observe from my vantage point), and
since (statistically speaking anyway) you believe that fluoride in
drinking water promotes dental health, that the sun is a giant nuclear
furnace, that Wall Street is substantially different from Las Vegas,
that a low-fat diet is an effective way to lose weight, that black holes
exist, and that point of the War on Drugs is to stop people from harming
themselves — well, in light of all that, a proof hardly seems
called-for. Instead, I shall perform a series of short vignettes, each
intended to invoke the spirit of a different forest animal or
supermarket checkout animal. Then I shall spray you with a dose of a new
household aerosol which I have invented and which I am marketing under
the name “Doubt-B-Gone”.
We can use foreach as an if-then-else construct by using lists to
represent booleans.
Using null to represent false, and cons anything to represent
true, we use the else part of foreach to accomplish a boolean
if-then-else. We can employ ; to get boolean OR and nested foreaches to get boolean AND. (Detailed examples of these can be
found in the unit tests of the Quylthulg reference interpreter,
which is called “Qlzqqlzuup, Lord of Flesh”.)
We can construct an infinite loop by running foreach on a cyclic
data structure.
For example,
foreach $x$ = :L:[1, 2, 3, goto $L$] with $a$ = 0 be $x$ else be null
never finishes evaluating, and in the body, $x$ takes on the
values 1, 2, 3, 1, 2, 3, … ad infinitum.
We can treat the accumulator of a foreach like an unbounded tape,
just like on a Turing machine.
We can pass in a cons cell where the first value is a list
representing everything to the left of the head, and the second
value is a list representing everything to the right of the head.
Moving the head left or right can be accomplished by taking the
first (<) off the appropriate list and cons (,) it onto the
other list. There are also other ways to do it, of course. The point
is that there is no bound specified on the length of a list in
Quylthulg.
We can, in fact, make foreach act like a while construct.
We just combine the looping forever with an if-then-else which
evaluates to abort when the condition comes true.
We can give foreach a cyclic tree-like data structure which
describes the finite control of a Turing machine.
Although we don’t have to — we could just use nested foreaches to
make a lot of tests against constant values.
We can even make foreach work like let if we need to.
Just bind the accumulator to $Name$, refer to $Name$ in the
body, and ignore the contents of the one-element list. Or use it to
bind two variables in one foreach.
PHHSHHHHHHHHHHHHHHTt.
Discussion
Now I’m hardly the first person to suggest using cyclic lists as an
equivalent alternative to a general looping construct such as while.
It has long been a stylish LISP programming
technique. However,
to comply with the Nietzschean-Calvinist mandate of our society (that
is, to sustain the progress that will thrust us toward the
“Perfect Meat at the End of Time” of which Hegel spoke,) we must demonstrate that we have innovated:
Quylthulg provides only this method of looping; without it, it
would not be Turing-complete, and
Unlike the extant stylish programming techniques, which require
side-effecting operations such as rplacd to pull off, Quylthulg is
a pure functional programming language without updatable storage.
Huzzah.
It is somewhat sad to consider just how long Quylthulg took to design
and how much of that labour took place aboard airplanes. It is even
sadder to consider some of the delusions I was occupied with while
designing it. Some of the biggest were the idea that foreach somehow
had to be recursable for this to work — it doesn’t, but I left it in.
For similar reasons I left in ;, the append operator. And I’ve already
mentioned the headaches with allowing labels and gotos in expressions
rather than only in literals.
Long live the new flesh, eh?
Chris Pressey
Seattle, Washington
Dec 6, 2008
This is a simple UI program that allows you to easily explore the concept of the pytschirp project. This project builds Python language bindings for MIDI-capable synthesizers, to allow you to program these synthesizers in, you guessed it, Python.
Real synthesizer programming.
For the time being, currently only the Sequential Prophet Rev2 synthesizer is supported, but many more synths are on their way, let us know if you have a specific device you want supported.
If you acquire the software, this is what you will get:
Effectively it is a little code editor already preloaded with a python interpreter and pytschirp, so you can type into the edit window, execute the python by pressing CTRL-ENTER, and see the output, error messages, as well as the generated MIDI commands going back and forth between your computer and the synthesizer.
You can use it a little bit like a Jupyter Notebook by selecting text and then using ALT-ENTER to execute only the selection.
Live editing of synthesizers is possible.
Example
Creating the synthesizer in Python is as easy as it gets with just three lines of code:
import pytschirp
r = pytschirp.Rev2()
r.detect()
This will produce some MIDI messages in the lower right corner of the screen, and when everything is setup properly (the computer can talk to the Rev2), we are now ready for live editing the edit buffer of the synthesizer. For this, we will retrieve the edit buffer object:
e = r.editBuffer()
which is now “alive” in that every modification we make in python to the edit buffer, MIDI commands will be sent immediately to the synth.
So for example, if you want to set the cutoff parameter:
e.Cutoff = 0
will set that value. Alternatively, you can get a textual print out of the whole edit buffer by doing a
print(e.toText())
Python is ideally suited to to complex things, for example randomize the track one of the gated sequencer in a specific value range by:
import random
e["Seq Track 1"] = [random.randrange(30, 80) for _ in range(16)]
You get the gist. There are some real-life examples in the aptly called examples directory, have a look at them.
Full documentation on the language bindings of pytschirp will be created inside the pytschirp project, head over there for the in-depth infos. pytschirp can be used standalone from any python interpreter or even Jupyter notebook, the PyTschirper UI program is only a little tool that allows people to quickly explore the idea.
Building the software
Supported platforms
Tested currently only on Windows 10, but all technology used is cross platform and it should be possible to build on Linux and Mac OS, if you know what you are doing.
Prerequisites
We use CMake 3.14 and Visual Studio 2017 for C++. Make sure to have both of these installed. Newer Visual Studios might work as well, you can select them as generators in CMake. We also require a Python 3.6 installation.
The recursive clone with submodules is required to retrieve the following additional modules already into the right spot inside the source tree:
We use the magnificent JUCE library to immensly reduce the amount of work we have to do.
juce-cmake to allow us to use JUCE and CMake together.
pybind11 is the solution to use C++ code from within Python, as is done by the pytschirp project, as well as embedding Python into C++ code, which is what we do here in PyTschirper.
The configure step will download (on Windows) the allmighty boost library, sorry for the bloat but I simply had no time to remove the dependency yet. All my professional projects of course rely on boost, so it is a natural to incorporate it here as well.
Building on Windows
Using CMake and building is a simple step if the prerequisites are fulfilled. Simply open a command line in the downloaded root directory <PyTschirpDir> and run
This will generate a solution file for Visual Studio in the builds subdirctory. You can build the software to run it immediately with the command
cmake --build builds --config Release
This will produce the executable in the path builds\source\Release, namely a file called PyTschirper.exe which you can double click and launch.
Licensing
As some substantial work has gone into the development of this, I decided to offer a dual license – AGPL, see the LICENSE.md file for the details, for everybody interested in how this works and willing to spend some time her- or himself on this, and a commercial MIT license available from me on request. Thus I can help the OpenSource community without blocking possible commercial applications.
Contributing
All pull requests and issues welcome, I will try to get back to you as soon as I can. Due to the dual licensing please be aware that I will need to request transfer of copyright on accepting a PR.
About the author
Christof is a lifelong software developer having worked in various industries, and can’t stop his programming hobby anyway.
BizCardX is a Streamlit application that effortlessly streamlines business card data extraction through advanced OCR technology. Users can easily upload card images to retrieve essential details, including company names, cardholder names, contact information, and more. With a strong focus on data security and user authentication, BizCardX ensures secure data storage and offers streamlined management via the user-friendly Streamlit UI. Experience an efficient, secure, and user-friendly solution for managing business card information effortlessly with BizCardX.
Table of Contents
Key Technologies and Skills
Installation
Usage
Features
Contributing
License
Contact
Key Technologies and Skills
Python
EasyOCR
Data Extraction
Streamlit (GUI development)
PostgreSQL (Database management)
Installation
To run this project, you need to install the following packages:
Clone the repository: git clone https://github.com/gopiashokan/BizCardX-Extracting-Business-Card-Data-with-OCR.git
Install the required packages: pip install -r requirements.txt
Run the Streamlit app: streamlit run app.py
Access the app in your browser at http://localhost:8501
Features
BizCardX offers a range of powerful features to streamline the extraction and management of business card information with a strong emphasis on data protection.
Business Card Data Extraction
Effortless Extraction: Easily extract information from business cards by uploading an image, thanks to BizCardX’s integration with the easyOCR (Optical Character Recognition) library.
Encountering errors while extracting image data using EasyOCR in local IDEs led to the adoption of
Google Colab for this process
Structured Presentation: The extracted data is elegantly presented alongside the uploaded image, ensuring a clear and organized overview.
Comprehensive Information: Extracted details include the company name, cardholder name, designation, contact information, and address.
User-Friendly GUI: Navigate and interact with the user-friendly graphical interface for a seamless experience.
Data Storage and Authentication
Secure Authentication: Safeguard your data with user authentication, ensuring that only authorized users can access and manage it.
Data Verification: Review and confirm the extracted data before it’s securely stored in the database. Make necessary changes with confidence.
Data Management and Editing
Credential Verification: To edit database records, verify your credentials (username and password) for added security.
Effortless Editing: Easily modify your data as needed, and watch as the changes are automatically updated in the database.
Secure Data Deletion
Protected Data: Ensure the safety of your data with strong user authentication, preventing unauthorized access or deletion.
Credentials Check: When initiating data deletion, BizCardX verifies your username and password, displaying a list of associated records.
BizCardX emphasizes data protection, providing secure and user-friendly tools for managing your business card information.
Contributing
Contributions to this project are welcome! If you encounter any issues or have suggestions for improvements, please feel free to submit a pull request.
License
This project is licensed under the MIT License. Please review the LICENSE file for more details.
monkeyplug is a little script to censor profanity in audio files (intended for podcasts, but YMMV) in a few simple steps:
The user provides a local audio file (or a URL pointing to an audio file which is downloaded)
Either Whisper (GitHub) or the Vosk–API is used to recognize speech in the audio file
Each recognized word is checked against a list of profanity or other words you’d like muted
ffmpeg is used to create a cleaned audio file, muting or “bleeping” the objectional words
You can then use your favorite media player to play the cleaned audio file.
If provided a video file for input, monkeyplug will attempt to process the audio stream from the file and remultiplex it, copying the original video stream.
monkeyplug is part of a family of projects with similar goals:
To install FFmpeg, use your operating system’s package manager or install binaries from ffmpeg.org. The Python dependencies will be installed automatically if you are using pip to install monkeyplug, except for vosk or openai-whisper; as monkeyplug can work with both speech recognition engines, there is not a hard installation requirement for either until runtime.
usage
usage: monkeyplug.py <arguments>

monkeyplug.py

options:
  -v, --verbose [true|false]
                        Verbose/debug output
  -m, --mode <string>   Speech recognition engine (whisper|vosk) (default: whisper)
  -i, --input <string>  Input file (or URL)
  -o, --output <string>
                        Output file
  --output-json <string>
                        Output file to store transcript JSON
  -w, --swears <profanity file>
                        text file containing profanity (default: "swears.txt")
  -a, --audio-params APARAMS
                        Audio parameters for ffmpeg (default depends on output audio codec)
  -c, --channels <int>  Audio output channels (default: 2)
  -s, --sample-rate <int>
                        Audio output sample rate (default: 48000)
  -f, --format <string>
                        Output file format (default: inferred from extension of --output, or "MATCH")
  --pad-milliseconds <int>
                        Milliseconds to pad on either side of muted segments (default: 0)
  --pad-milliseconds-pre <int>
                        Milliseconds to pad before muted segments (default: 0)
  --pad-milliseconds-post <int>
                        Milliseconds to pad after muted segments (default: 0)
  -b, --beep [true|false]
                        Beep instead of silence
  -h, --beep-hertz <int>
                        Beep frequency hertz (default: 1000)
  --beep-mix-normalize [true|false]
                        Normalize mix of audio and beeps (default: False)
  --beep-audio-weight <int>
                        Mix weight for non-beeped audio (default: 1)
  --beep-sine-weight <int>
                        Mix weight for beep (default: 1)
  --beep-dropout-transition <int>
                        Dropout transition for beep (default: 0)
  --force [true|false]  Process file despite existence of embedded tag

VOSK Options:
  --vosk-model-dir <string>
                        VOSK model directory (default: ~/.cache/vosk)
  --vosk-read-frames-chunk <int>
                        WAV frame chunk (default: 8000)

Whisper Options:
  --whisper-model-dir <string>
                        Whisper model directory (~/.cache/whisper)
  --whisper-model-name <string>
                        Whisper model name (base.en)
  --torch-threads <int>
                        Number of threads used by torch for CPU inference (0)
Docker
Alternately, a Dockerfile is provided to allow you to run monkeyplug in Docker. You can pull one of the following images: