Although there are multiple implementations of image stitching using different libraries (OpenCV, skimage, …) this repository contains image stitching using only numpy for computations and cv2 for displaying images. Both projective transformation fitting and RANSAC are implemented using numpy, but the undistortion is done using cv2 library.
Repository Contents
There are 2 example photos already present in distorted and undistorted form: examples/distorted000.png, examples/undistorted000.png, examples/distorted001.png, examples/undistorted001.png:
Example 000:
Example 001:
If you wish to take your own photos using ESP32-CAM you can capture them using image_capture.py script. You can take a screenshot with the space bar.
The repository also contains examples/matching_points_000_001.txt – 5 pairs of matching keypoints between images examples/undistorted000.png and examples/undistorted001.png picked by hand.
Run python stitch_using_points.py <path_to_img1> <path_to_img2> <path_to_points_file> to generate a stitched image from 2 given images using hand-picked matching keypoints. You can simply run python stitch_using_points.py to use example images. Sample panorama generated by this script examples/panorama_task_5.png:
Run python stitch.py <path_to_img1> <path_to_img2> to generate a stitched image from 2 given images using automatically picked matching keypoints. You can simply run python stitch.py to use example images. Sample panorama generated by this script examples/panorama_task_7.png:
People are relying on AI agents to assist them with various tasks. The human must know when to
rely on the agent, collaborate with the agent, or ignore its suggestions. Our procedure gives a way to understand better how the human and the AI should collaborate.
The first piece is the human’s prior knowledge and trust of the AI, i.e., does the human trust the AI on all the data, never trust the AI, or trust the AI on only a subset of the data? Given the human’s prior, we discover and describe regions of the data space that disprove the human’s prior. For example, if human always trusted AI, we find a (or many) subset (s) of the data and describe it in natural language where the AI has worse performance than the human (and vice versa).
Concretely, our procedure is composed of two parts:
A region discovery algorithm (IntegrAI-discover) that discovers such subsets of the data space as local neighborhoods in a cross-modal embedding space.
A region description algorithm (IntegrAI-describe) that describes these subsets in natural language using large language models (LLMs).
Each of these algorithms is implemented in this repo as well as baseline approaches with multiple datasets to test them on.
The algorithm IntegrAI can be used to compare two models or look at the errors of a single model.
For an example of how to use IntegrAI, we provide an example on an image classification task in the notebook demo_imagenet.ipynb. For a Colab version, please check colab jupyter notebook
An NLP demo will soon be provided as well.
Organization
This code repository is structured as follows:
in integrai we have a minimal code implementation of our algorithm IntegrAI – if you’re just interested in applying the method, only look at this folder
in src we have the code for the core functionalities of our algorithms for the paper organized as follows:
–src/datasets_hai has files for each dataset used in our method and code to download and process the datasets.
–src/describers has files for each region description method in our paper
–src/teacher_methods has files for each region discovery method in our paper
Note: all experiments involve randomness, so results are not deterministic.
Citation
@article{mozannar2023effective,
     title={Effective Human-AI Teams via Learned Natural Language Rules and Onboarding},
      author={Hussein Mozannar and Jimin J Lee and Dennis Wei and Prasanna Sattigeri and Subhro Das and David Sontag},
      year={2023},
      journal={Advances in Neural Information Processing Systems}
}
Acknowledgements
This work is partially funded by the MIT-IBM Watson AI Lab.
Fast, intuitive, and stylish TUI notes app designed specifically for capturing spontaneous ideas and thoughts. Built with simplicity and efficiency in mind, JotTerm is your go-to solution for quickly jotting down notes directly from the terminal. Save time and focus on what matters with JotTerm’s streamlined interface and user-friendly commands.
JotTerm is a lightweight terminal-based notes app built for users who need to quickly jot down ideas without the hassle of navigating directories or opening an editor. With its modern interface, JotTerm offers a seamless experience for creating, editing, and managing your notes, all within the terminal.
⭐ Features
Instant note-taking from the terminal
Simple and modern TUI interface
Create, edit, and delete notes with simple commands
Customizable color schemes
Automatically saves notes in a designated folder
🛠️ Installation
Clone the repository to your local machine:
git clone https://github.com/spmfte/JotTerm.git
Change to the JotTerm directory:
cd JotTerm
Make the jotterm.sh script executable:
chmod +x jotterm.sh
Create an alias for easy access (optional, add to your shell profile, e.g., .bashrc, .zshrc):
alias note='cd ~/path/to/JotTerm && ./jotterm.sh && cd ~'
Reload your shell profile(~/.zshrc or ~/.bashrc):
source~/.zshrc
or
source~/.bashrc
💻 Usage
Run JotTerm from the terminal:
note
🎨 Customization
You can customize the color scheme and other settings by editing the jotterm.sh script.
📬 Contributing
We welcome contributions from the community! If you’d like to contribute to JotTerm, please follow these steps:
Fork the repository on GitHub
Clone your fork
Create a new branch for your changes
Commit your changes and push to your branch
Open a Pull Request with a detailed description of your changes
Don’t forget to add your name and GitHub profile link to the list of contributors below.
🏆 Contributors
📄 License
This project is licensed under the MIT License – see the LICENSE file for details.
📞 Get in touch
If you have any questions or suggestions, feel free to open an issue or submit a pull request.
📢 This module is no longer maintained. We recommend using a newer version from terraform-do-modules for better performance and stability. If you have any questions or concerns, please don’t hesitate to ask for assistance.
Terraform DigitalOcean SSH Key
Provides a DigitalOcean SSH key resource to allow you to manage SSH keys for Droplet access.
We eat, drink, sleep and most importantly love DevOps. We are working towards strategies for standardizing architecture while ensuring security for the infrastructure. We are strong believer of the philosophy Bigger problems are always solved by breaking them into smaller manageable problems. Resonating with microservices architecture, it is considered best-practice to run database, cluster, storage in smaller connected yet manageable pieces within the infrastructure.
This module is basically combination of Terraform open source and includes automatation tests and examples. It also helps to create and improve your infrastructure with minimalistic code instead of maintaining the whole infrastructure code yourself.
We have fifty plus terraform modules. A few of them are comepleted and are available for open source usage while a few others are in progress.
In this module testing is performed with terratest and it creates a small piece of infrastructure, matches the output like ARN, ID and Tags name etc and destroy infrastructure in your AWS account. This testing is written in GO, so you need a GO environment in your system.
You need to run the following command in the testing folder:
go test -run Test
Feedback
If you come accross a bug or have any feedback, please log it in our issue tracker, or feel free to drop us an email at hello@clouddrove.com.
If you have found it worth your time, go ahead and give us a ★ on our GitHub!
About us
At CloudDrove, we offer expert guidance, implementation support and services to help organisations accelerate their journey to the cloud. Our services include docker and container orchestration, cloud migration and adoption, infrastructure automation, application modernisation and remediation, and performance engineering.
This is a project on Superhero Hunter on Marvel API
A web application that allows users to search for their favorite superheroes and add them to their list of favorites. This project uses the Marvel API to fetch superhero data.
Super Hero Hunter is a web application developed using vanilla JavaScript. It leverages the Marvel API to fetch information about superheroes. Users can see home page with Superheroes and can search for superheroes, view detailed information about them, and add them to their list of favorite superheroes.
Features
Home page shows Superheroes cards.
Search for superheroes by name.
View detailed information about each superhero, including their name, photo, biography, comics, events, series, and stories.
Add superheroes to your list of favorite superheroes.
Remove superheroes from your list of favorite superheroes.
Demo
Watch a brief demo of the Super Hero Hunter application on YouTube.
Open the index.html file in your web browser to launch the application.
Usage
Home page shows the Superheroes.
Enter a superhero name in the search bar to search for superheroes.
Click the “More Info” button on a superhero card to view detailed information about that superhero.
Click the heart icon to add a superhero to your list of favorite superheroes.
Visit the “Favourites” page to see your list of favorite superheroes.
Click the “Remove” button to remove a superhero from your list of favorite superheroes.
Persistence
The list of favorite superheroes is stored locally using localStorage. This means your favorite superheroes will persist even after closing the browser.
Contributing
Contributions are welcome! If you have any improvements or suggestions, please create a pull request.
Discord Bot running designhub’s Discord Server based on GuideBot from AnIdiotsGuide written in discord.js Fell free to contribute if any feature’s missing
Cario York Dev uses canvas, you will need to install all prerequisites for your operating system.
You also need your bot’s token. This is obtained by creating an application in
the Developer section of discordapp.com. Check the first section of this page
for more info.
In the folder from where you ran the git command, run cd discord-bot and then run npm install, this will install all required packages, then it will run the installer.
You will be prompted to supply a number of access tokens and keys for various platforms, please follow the on screen instructions to complete the installation.
NOTE: A config file will be created for you.
Starting the bot
To start the bot, in the command prompt, run the following command: node app.js
Inviting to a guild
To add the bot to your guild, you have to get an oauth link for it.
This project uses gitmoji for all commit messages:
Gitmoji is an initiative to standardize and explain the use of emojis on GitHub commit messages. Using emojis on commit messages provides an easy way of identifying the purpose or intention of a commit.
A segway-like balancing two-wheel robot built on ESP8266. It is controlled over WiFi via a HTML/JS GUI and a WebSocket. This is a work in progress. The firmware is meant to run on a WEMOS D1 mini or a similar board.
NOTE for existing users: the Arduino version of this code is deprecated and will not receive the newest improvements from the main branch. However, the Arduino branch will remain in this repo. If you’d like to have something improved or fixed there, please open an issue or preferably a pull request.
Getting started
The firmware is built on the esp-open-rtos project which is included as a submodule in this repo.
For building the firmware, a Linux host is recommended. For other platforms, there is a Docker image one can use. The docker-run script in this repository contains the command that’s required to download the image and run commands in the container. It should work fine on macOS hosts. For Windows hosts, I still recommend installing Linux in a virtual machine and installing the tools there.
Installing the tools and building
NOTE: if you intend to use Docker, you only have to install esptool, git and make on your host. Please see below for further Docker instructions.
Building the firmware using the supplied Docker image is easy. Instead of running make parallel, just run ./docker-run make parallel in the root folder of the repo. The command supplied to the script will be run in the Docker container, and the image will be automatically downloaded.
Flashing the image differs, though, and for this you’ll need make on your host. Instead of
make flash ESPPORT=/dev/ttyUSBx
(/dev/ttyUSBx being the ESP’s serial port) run
make flash-only ESPPORT=/dev/ttyUSBx
in your host shell. The separate flash-only target is needed because the flash target would try to build the firmware. In the future, it is intended to provide a separate Python script for flashing, lifting the need for make on host.
TODO: docker-compose configuration file for even easier usage
Installing the tools manually (not recommended, not guaranteed to work)
WARNING: As of currently, the compiler installed by this method seems to have issues compiling the code. Thus this method is not recommended. Please see above for the Docker-based toolchain instead.
Install these packages:
git (from your package manager)
xtensa-lx106-elf toolchain. You can use esp-open-sdk to build it, see the instructions in the esp-open-rtos repo.
esptool (pip install -U esptool). Please do not use the outdated version pulled by esp-open-sdk.
tcc, nodejs and npm are currently required due to the frontend code, although I’m investigating how to relax this dependency.
Clone this repo (recursive cloning to get also esp-open-rtos and its submodules):
The parallel target does a clean build with 5 parallel worker threads to make it faster.
Plug your ESP8266 module in via USB and flash the firmware:
make flash
The default port is /dev/ttyUSB0. If you need to change this, use
make flash ESPPORT=/dev/ttyUSBx
Supported browsers
Please use the latest Firefox or Chrome if possible. The HTML/JS UI uses some
recent JavaScript features which might not be supported by older browsers. However if you encounter any issues on e.g. Safari, don’t hesitate to file them in the issue tracker.
Schematic & BOM
There is a PCB design and schematic in the schematic folder which has been tested and is ready to use. There, MPU6050 has been replaced by LSM6DS3 and L293D by DRV8835 for better performance.
Meanwhile, you can still build an ESPway using breakout boards available from the usual sources. A rough bill of materials for this is listed below:
(not including PCB, connectors, wire etc. materials)
WEMOS D1 Mini board
GY-521 (MPU6050 breakout board)
L293D motor driver IC
2x 6V 300rpm metal gear motor (search for “12ga 300rpm” or “n20 300rpm”), these should be $3-5 per piece
2x WS2812B neopixels for eyes and showing current state
AMS1117 5V regulator
5x 100n ceramic capacitors
2x 1000u 10V electrolytic capacitor
470 ohm resistor
10 kohm resistor
680 kohm resistor
To use the old hardware config and schematic, you’ll have to edit src/espway_config.h before compilation. See that file for notes.
See the schematic-old folder for the schematic. It is drawn with KiCad and there’s a rendered PDF in the repo.
The new schematic in schematic folder uses components
from kicad-ESP8266 by J. Dunmire,
licensed under CC-BY-SA 4.0. The schematic is also licensed under CC-BY-SA 4.0.
Developing the frontend
The HTML/JS frontend uses Webpack as the build system. You will need NodeJS and NPM (the package manager) to build the frontend pages. It does jobs like bundling the JavaScript modules together, minifying and transpiling the ES2015 code for older browsers, compiling Riot tags, minifying/autoprefixing CSS etc.
After you’ve cloned this repo, run npm install in the root folder to install the package dependencies. There are two commands specified in package.json which run Webpack:
npm run serve start a web server which serves the static HTML files in the frontend/output directory. It also watches for changes in the source files in frontend/src and automatically rebuilds and reloads them. Use this while hacking on the frontend. TODO: Currently this doesn’t see changes to HTML files, though.
npm run build produces a production build of the frontend JS/CSS bundles. Use this before uploading your work to the ESP8266.
License and acknowledgements
The project is licensed under LGPLv3.
The project uses esp-open-rtos which is licensed under the BSD 3-clause license. It also has some components which have different licenses. Read more about them in the esp-open-rtos README.
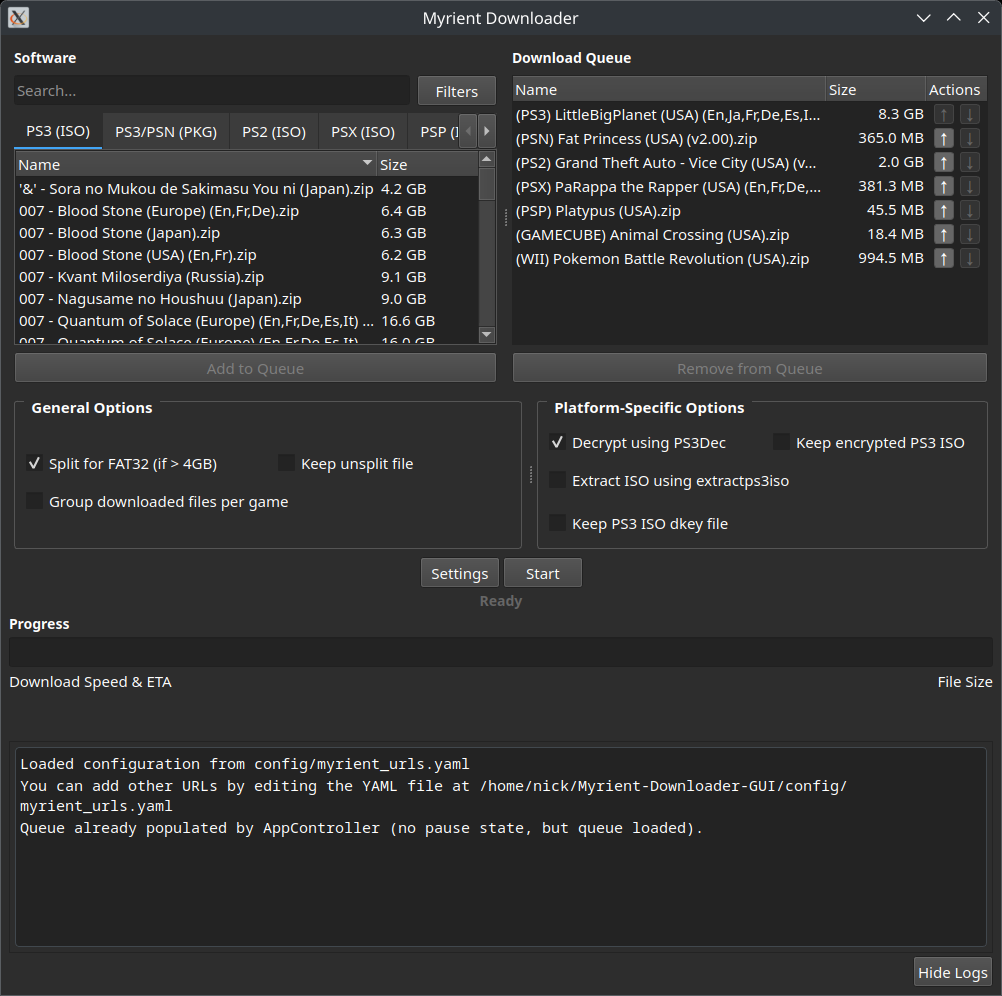
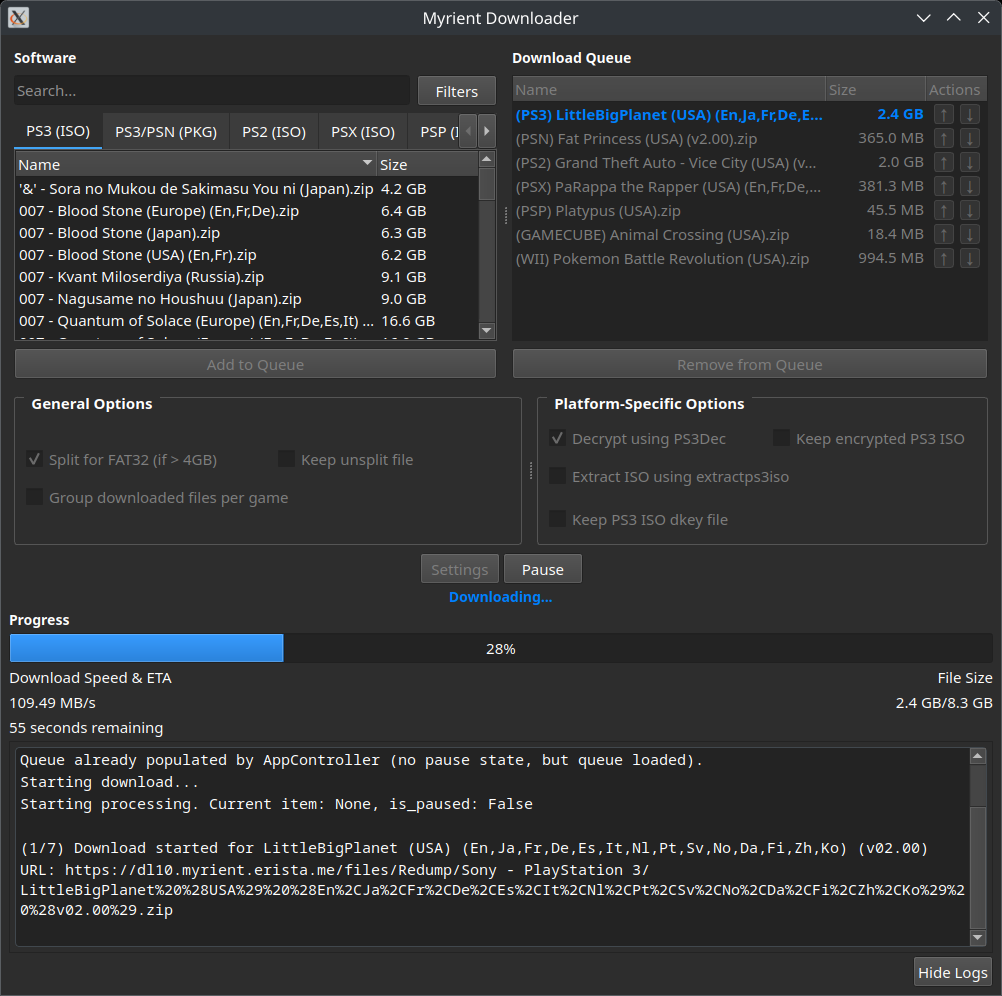
That’s it! File lists/necessary files will be retrieved automatically and stored in config/.
Required files for PS3 processing – Windows
Simply launch Myrient-Downloader-GUI and you should be prompted to automatically download the required tools from their respective repositories!
Alternatively, you can download the binaries PS3Dec and extractps3iso from below and manually specify them via Settings
Required files for PS3 processing – Linux
# Arch Linux (AUR)
yay -S ps3dec-git ps3iso-utils-git

# Or install manually from source repositories
Configuration
Platform Configuration
The application uses a dynamic YAML-based configuration system located in config/myrient_urls.yaml, allowing for easy addition of new platforms without changing code.
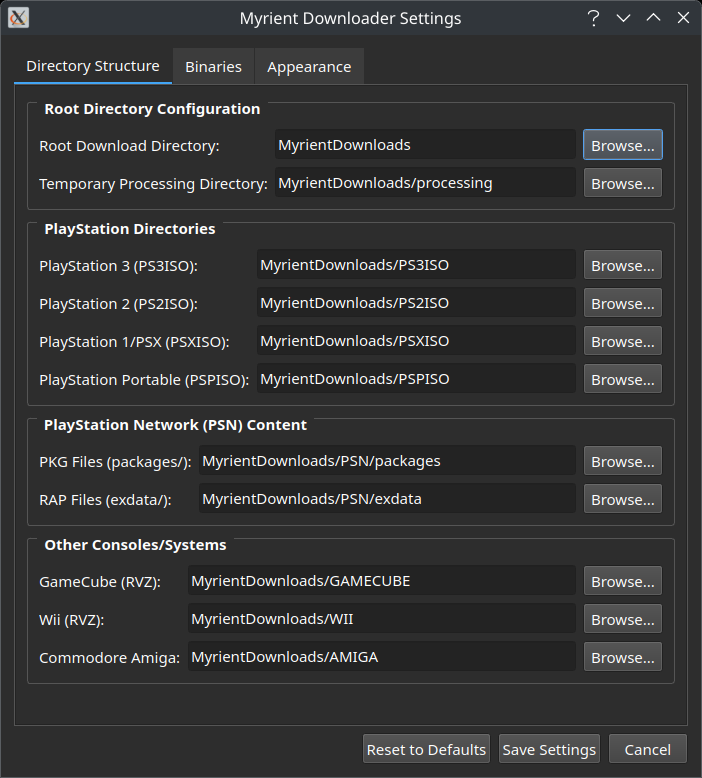
Settings Menu
The destination folders of in-progress and completed downloads for each platform can be defined via the Settings menu. Settings are saved to config/myrientDownloaderGUI.ini.
Vigu is a PHP error aggregation system, which collects all possible PHP errors and aggregates them in a Redis database. It includes a frontend to browse the data.
This project is based on Zaphod and uses several other projects:
Point your browser to the root of the site, to start browsing errors.
Installing
Clone vigu from git, i.e. git clone http://github.com/localgod/Vigu.git Vigu
Run php composer.phar install from command line.
Copy vigu.ini.dist to vigu.ini and edit it.
Make a vhost, to point at the root of vigu or the web/ folder, or however you choose to serve the site.
Set the daemon up, using php handlers/daemon.php -I. The daemon should be running at all times, but it may ONLY run on the Vigu server.
Copy vigu.ini to handlers/vigu.ini.
Include handlers/shutdown.php before anything else, preferably through php.ini’s auto_prepend_file directive. It has no dependencies besides it’s configuration file, which must exist next to it, so you can safely deploy it alone, to all your servers.
License
Copyright 2012 Jens Riisom Schultz, Johannes Skov Frandsen
Licensed under the Apache License, Version 2.0 (the “License”);
you may not use this file except in compliance with the License.
You may obtain a copy of the License at
http://www.apache.org/licenses/LICENSE-2.0
Unless required by applicable law or agreed to in writing, software
distributed under the License is distributed on an “AS IS” BASIS,
WITHOUT WARRANTIES OR CONDITIONS OF ANY KIND, either express or implied.
See the License for the specific language governing permissions and
limitations under the License.
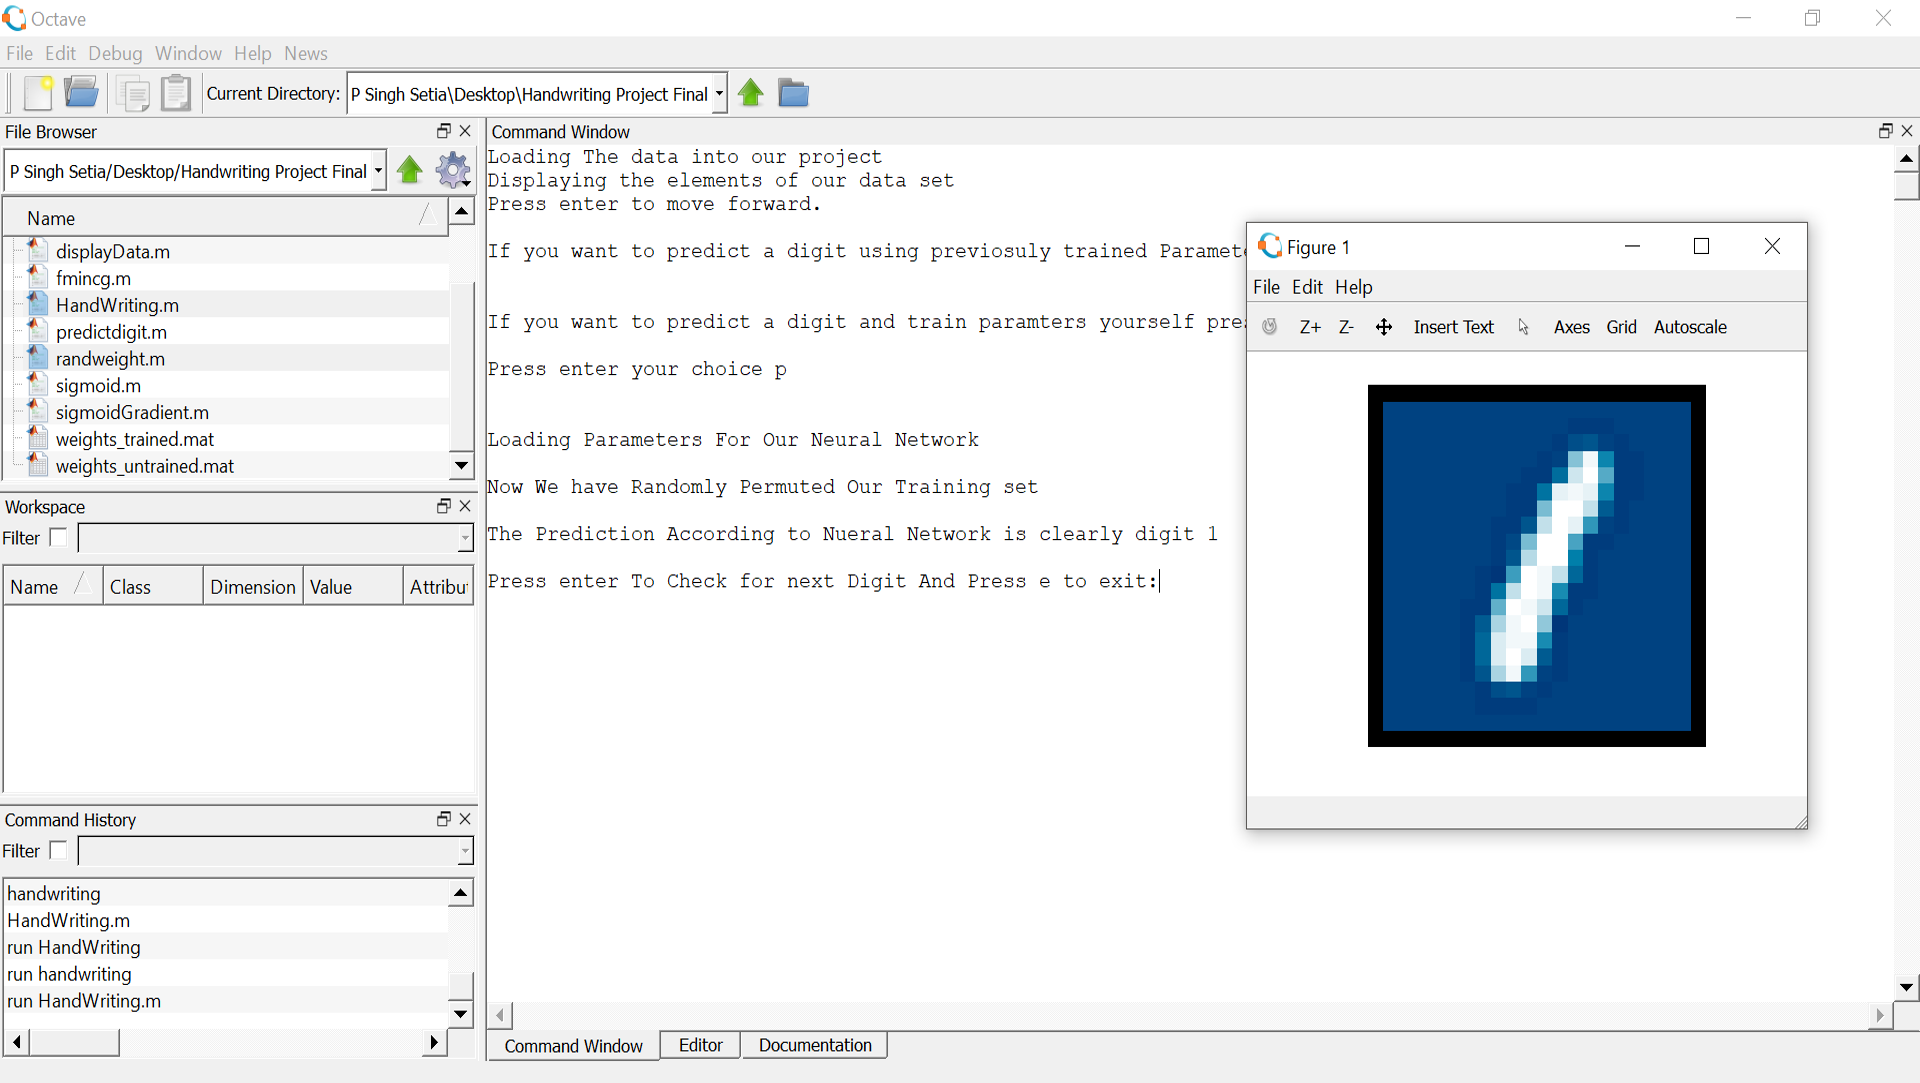
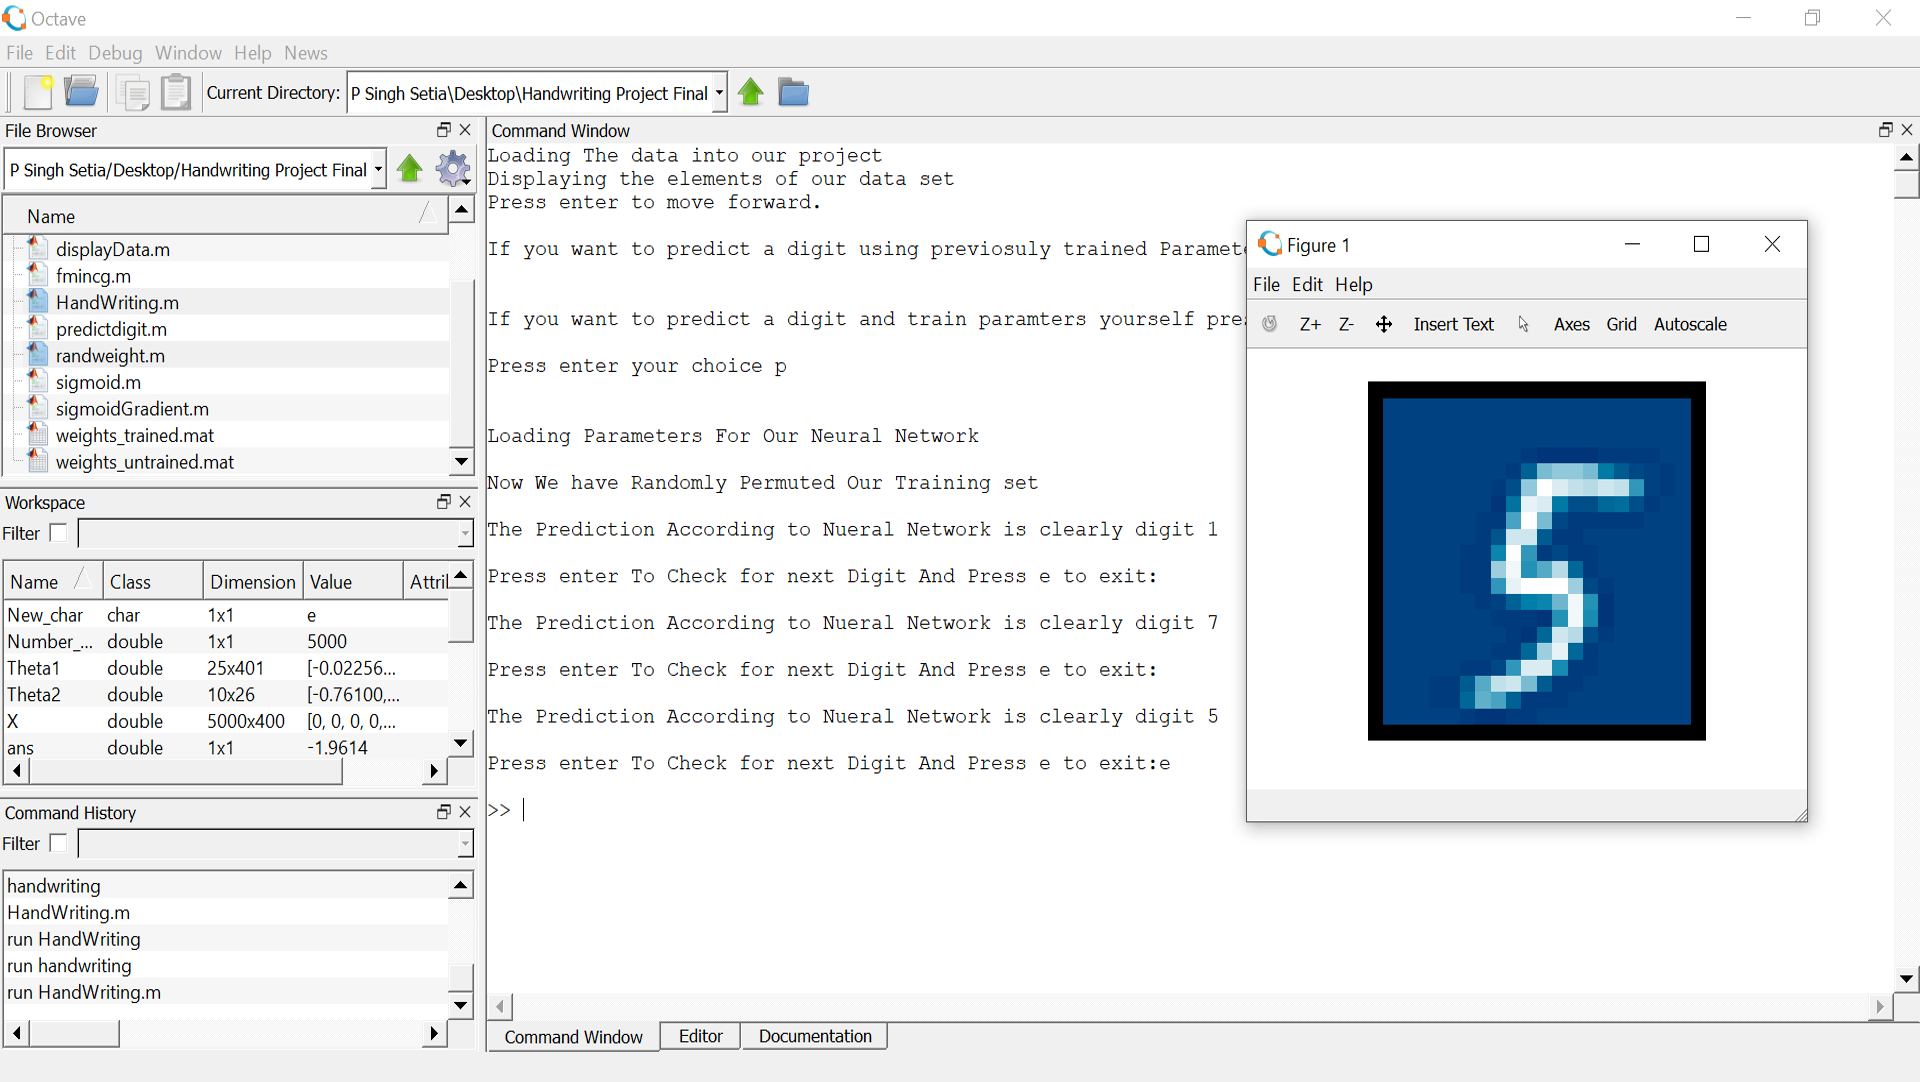
This project focuses on the implementation and development of handwritten digit recognition algorithm (back-propagation) using Artificial Neural Networks. It is a classification problem solved using aforementioned algorithm. A total of 400 input layers are used, corresponding to each pixel of the image and 10 output layers, corresponding to each digit from 0-9. The number of nodes in each hidden layer have been set to 25. The implementation of the same is done on Matlab, using Octave-GUI 4.2.1. ANN model was trained with 5000 images of various digits. The algorithm predicted English numerical digits with a maximum accuracy of 99.98%.
Approach
The proposed Neural Network Architecture consists of 3 layers i.e. input layer, hidden layer and the output layer. The input and the hidden layer is connected by weights theta1 and the hidden and the output layer is connected by weights theta2. The weighted sum from the hidden as well as the output layer can take any value ranging from 0 to infinity and hence in order to limit the value of the sum it’s passed through an activation function. In this scenario we use sigmoid function as the activation function where the value of sigmoid function always lies between 0 and 1.
A. Input Layer The input from the outside world/user is given to the input layer. Input is given in the form of a matrix X where the number of training examples is same as the number of rows in the matrix and the 400 pixels extracted from the image is arranged as one single row in the input matrix X. Hence the dimensions of matrix is given as X (Number of Training Examples x 400).
B. Hidden Layer There is no valid formula to calculate the number of units/nodes in the hidden layer. To minimize computational costs here the number of hidden nodes have been taken as 25.
C. Output Layer The output layer in this algorithm consists of 10 units with each unit representing various digits from 0-9.
Randomly initialize the weights
The weights connecting the input and the hidden layer as well as the hidden and the output layer are randomly initialized. The range of the weights are as given in Table
Forward Propagation
Step-1: The inputs given to the input layer is multiplied with the weights connecting the input and the hidden layer and then passed through sigmoid function. i.e. – Output one = SIGMOID(XTheta_layer_one)
Step-2: The Output_one is then multiplied with the weights connecting the hidden and the output layer and then passed through the sigmoid function. i.e.Output_two = SIGMOID (Output_oneTheta_layer_two) Hence this way we clearly obtain the final output of our network.
Cost Function
Initial value of the cost function is calculated using the randomly initialized values of weights connecting the input and the hidden layer and weights connecting the hidden and the output layer. Error regularization is taken into account while calculating the value of cost function and adjustments are made for the same.
Back Propagation
Back-propagation gives us a way to determine the error in the output of a previous layer given the output of a current layer. The process starts at the last layer and calculates the change in the weights for the last layer. Then we can calculate the error in the output of the previous layer. Using the error in each layer partial derivatives can be calculated for weights connecting the input and the hidden layer as well as weights connecting the hidden and the output layer.